Floater Frame - 1.5" Rabbet

Comes in packs of 3 or 6 frames

$83.00 - $541.00
(No reviews yet) Write a Review
SKU:
FF1.5R-1
Adding to cart… The item has been added
  • Made in our Los Angeles shop.
  • Ships within 5-7 business days.
  • Suitable for canvases or panels up to 1.5" deep.   1.5" deep artwork would be flush with the top/front of the frame. See FAQ for more information about mounting artwork less than 1.5" or thin panels.
  • You'd order the same size frame as your artwork.  So if you have a 12x12" canvas, you'd order a 12x12" frame.  The frame adds about an inch to the canvas/panel, so that a 12x12" frame has outer dimensions approximately 13x13".
  • Ships already assembled.    Custom sizes may need to ship unassembled.  Those orders need to be placed by email. See FAQ for more information about unassembled frames.
  • Comes with metal brackets and screws with which to attach your art to the frame.
  • For custom sizes, please email us.  Prices for custom sizes are not too much higher than those for standard sizes and also ship in the usual 5-7 business days.


Do your floater frames come with hanging hardware?
No. We include only the hardware needed to attach your artwork to the frame.  The hardware we send may not work well in all cases.  If you need help finding better choices, please email us for help. 

Can I get standard size frames unassembled?
We normally don’t sell our standard sizes unassembled. There are two exceptions: One, the order also contains large custom sizes like 36x48” and 48x60”. Two, the order is for multiple packs of our largest standard sizes, such as 30x40" and 36x36". Please email us the details to see if your order qualifies. We're eager to help you save on shipping so will make every possible accommodation.
 
Can I use these frames with thin panels, say 1/4" or 1/8" deep?

These frames are not a good bet for thin panels.  Instead, you should probably opt for our 3/4" rabbet floater frames.  But you may also want to consider our “Panel Frames” . Those are meant specifically for thin panels. The website has diagrams of the moulding’s exact profile and how the artwork goes in the frame.

To attach your panels to these frames you will need either glue or double-sided tape or velcro circles or tape. We do not include any hardware. If you want to use glue, the choice of glue will depend on the material of your panels. Wood glue should be a good choice for most anything, including paper. E6000 Adhesive is another good choice. For foam core and other such lighter materials, we use ATG tape. You may be able to use other kinds of double-sided tape as well. Home Depot and Michael’s both sell some strong and thin, two-sided tapes that will work nicely. Finally, some customers report good results with velcro circles and tape you can buy at craft stores. Some customers are using a product called “Elmers Poster Tack” to attach their panels into the frames. It’s easy to use and totally re-usable.

You may also like our "Strip Frames" with the 5/16” rabbet; they’re here

Now for the floater frames… We have a lot of customers who are putting relatively thin panels in our 1.5” deep floater frames. There are several options; they all boil down to somehow propping the panels up by putting some sort of shim/riser in the back. You simply need to prop up your artwork from the back with some cardboard, or foam-core, or wood. Small triangles in the corners will be enough. Once you have the desired height, then, depending on the method you used and your preference, you can then attach the artwork to the panels with glue, double-sided foam tape, or even one-sided tape that's wide enough to stick both to the back of your artwork and to the inside of the frame. You'll need to get a little creative.

Here is one customer’s inventive solution: http://robinrosenthalart.blogspot.com/p/blog-page_16.html


Can I use these frames with 1/2" or 5/8" deep artwork?
These frames are not a good bet for thin panels.  Instead, you should probably opt for our 3/4" rabbet floater frames. Keep in mind that your 1/2" or 5/8” artwork would sit a little low in those frames because they’re designed for 3/4” deep artwork to be flush with the top of the frame. You may be ok with that recessed look. If you’re not, and would rather the canvases be flush with the front of the frame, you’d simply put some sort of shim/riser between your canvas and the frame before attaching the canvas. We would suggest using cardboard or foam-core. Small cardboard triangles, one in each corner, works nicely. You can also use thin strips of double-sided foam tape.
 
What's the difference between the two kinds of Black floater frames?
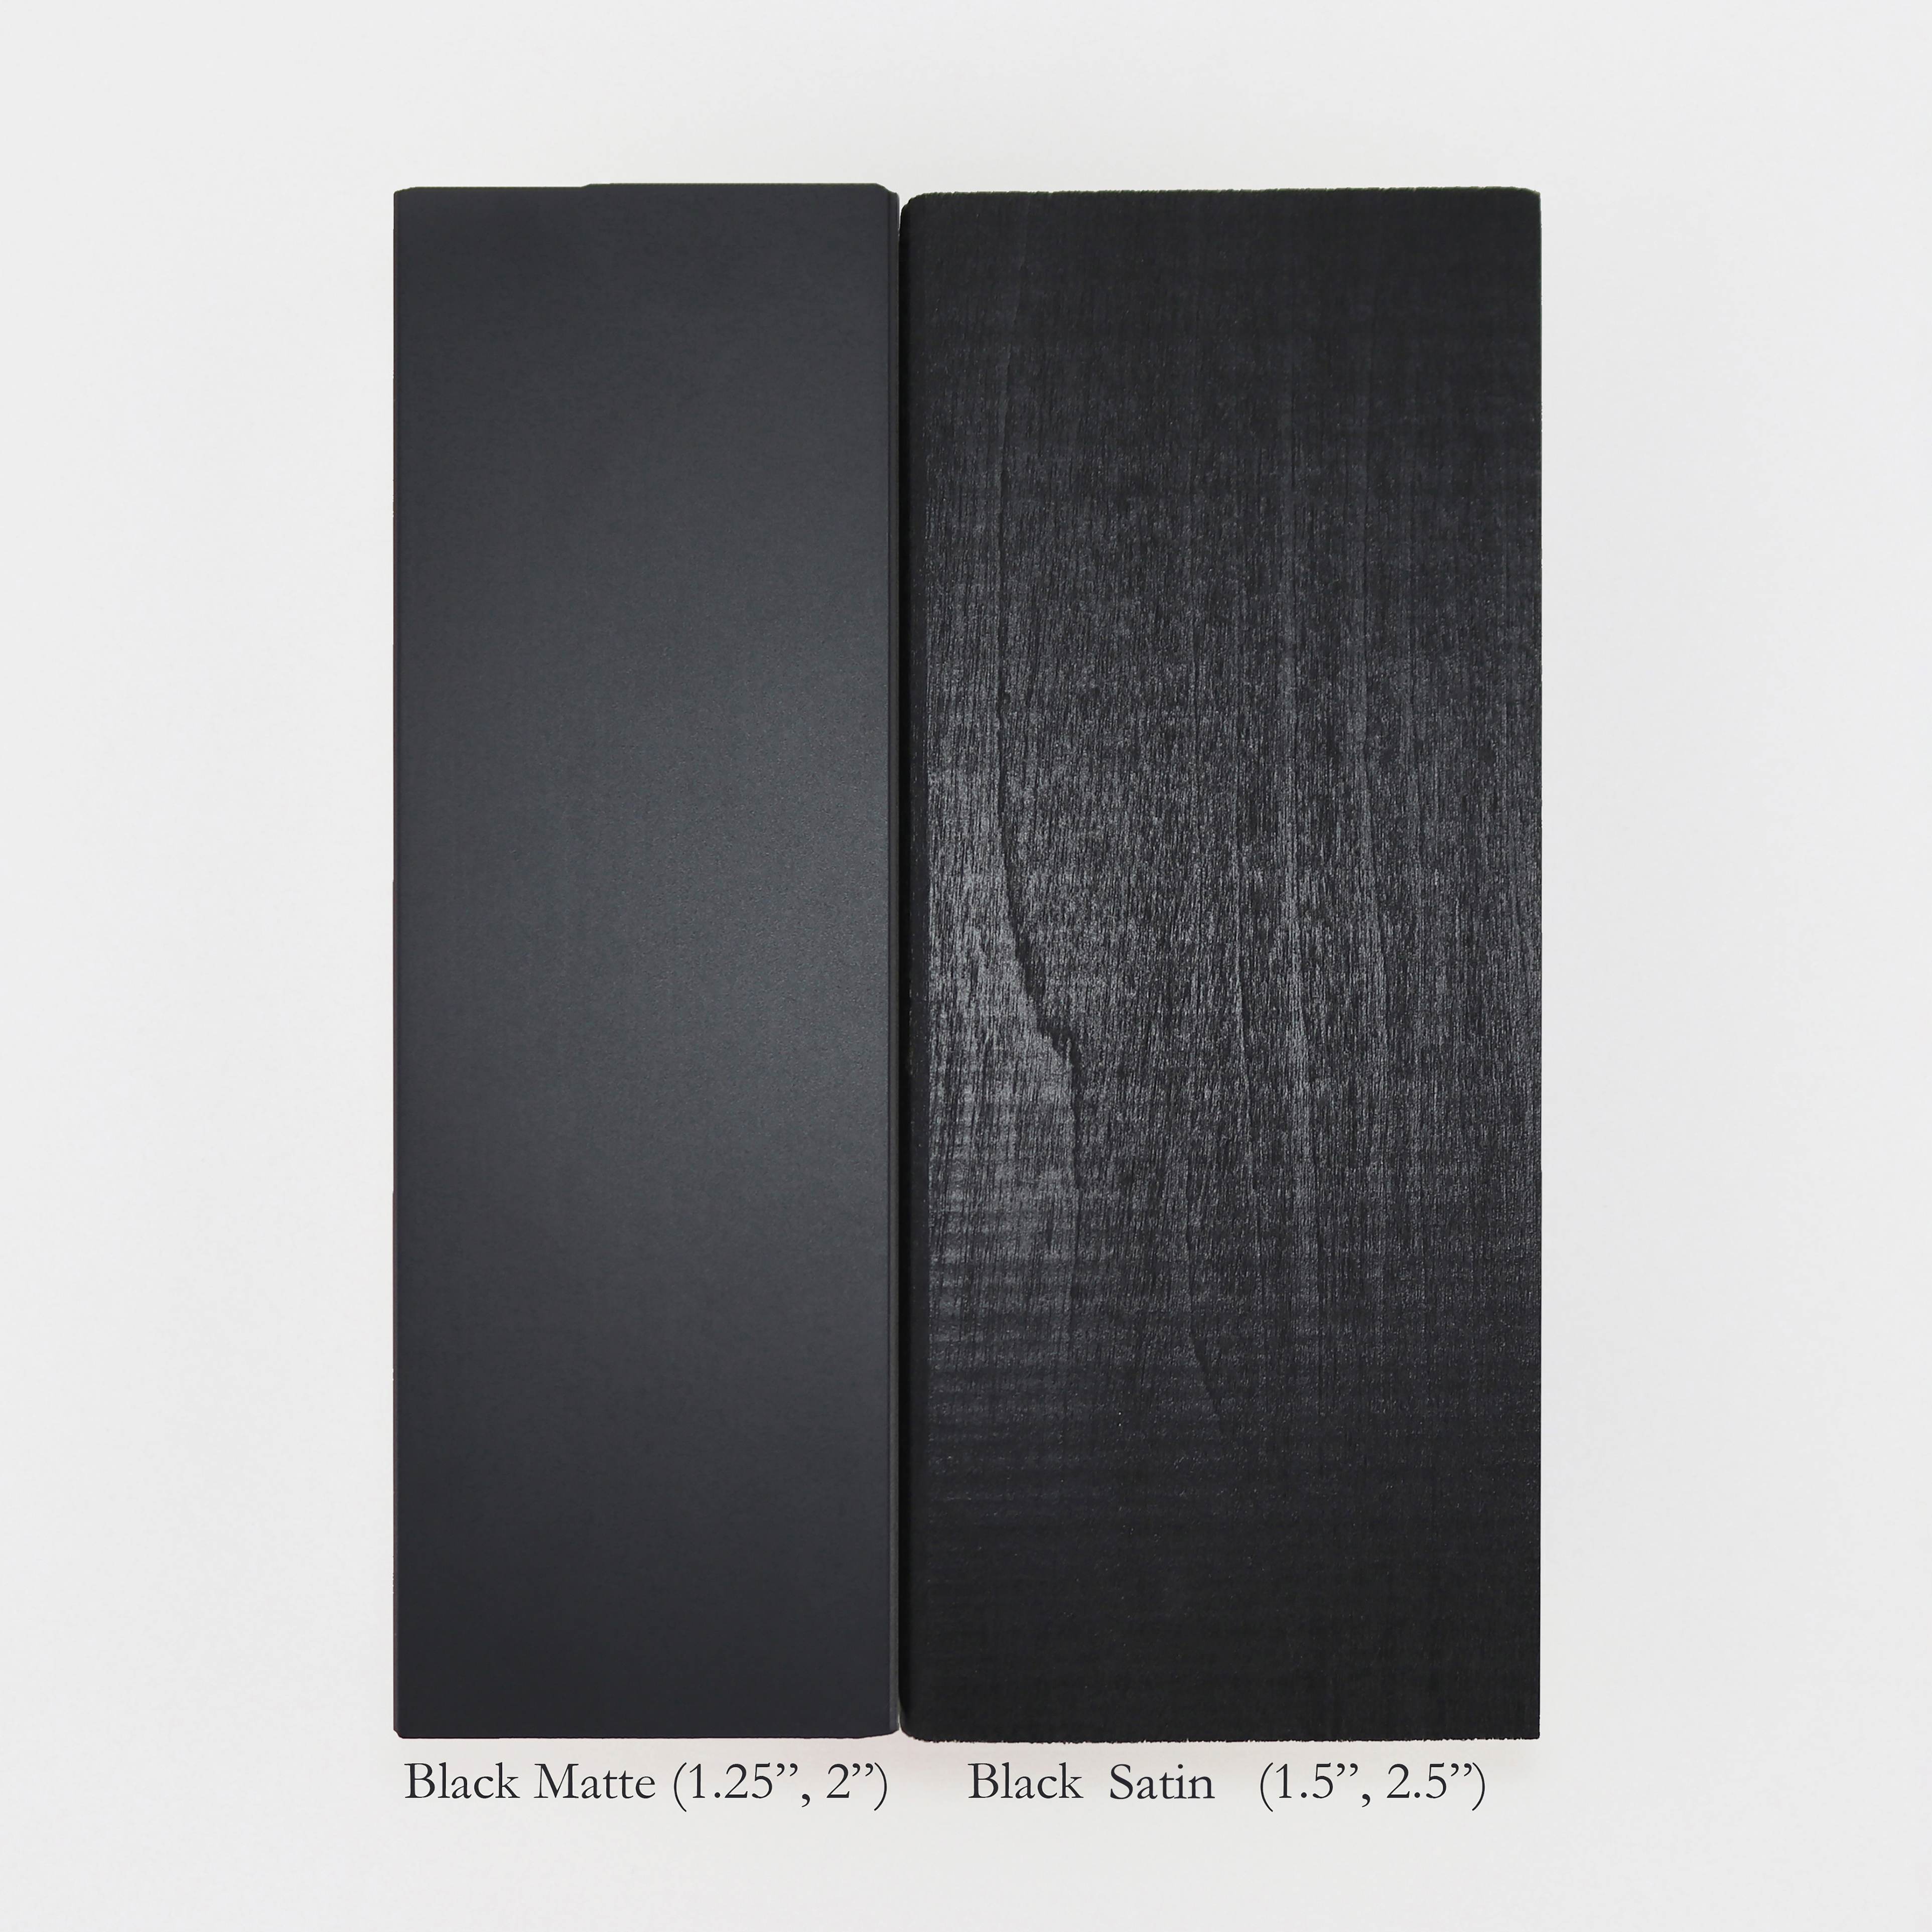
We have two kinds of black floater frames. The 1.5” and 2.5” deep ones have one kind of finish/paint, and the 1.25” and the 2” deep ones, another. The 1.5” and 2.5” deep ones are slightly more glossy; the wood grain is visible under the paint. The 1.25” and the 2” deep ones have a matte/eggshell finish; you can’t see the wood grain under the paint. Please see the photo below showing a side-by-side comparison of the finish.  The profiles of the two are also slightly different. For exact dimensions, please look at the diagrams on their respective product pages.  

natural woods compared
What's the difference between Doug Fir, Maple, Walnut, and White Oak?

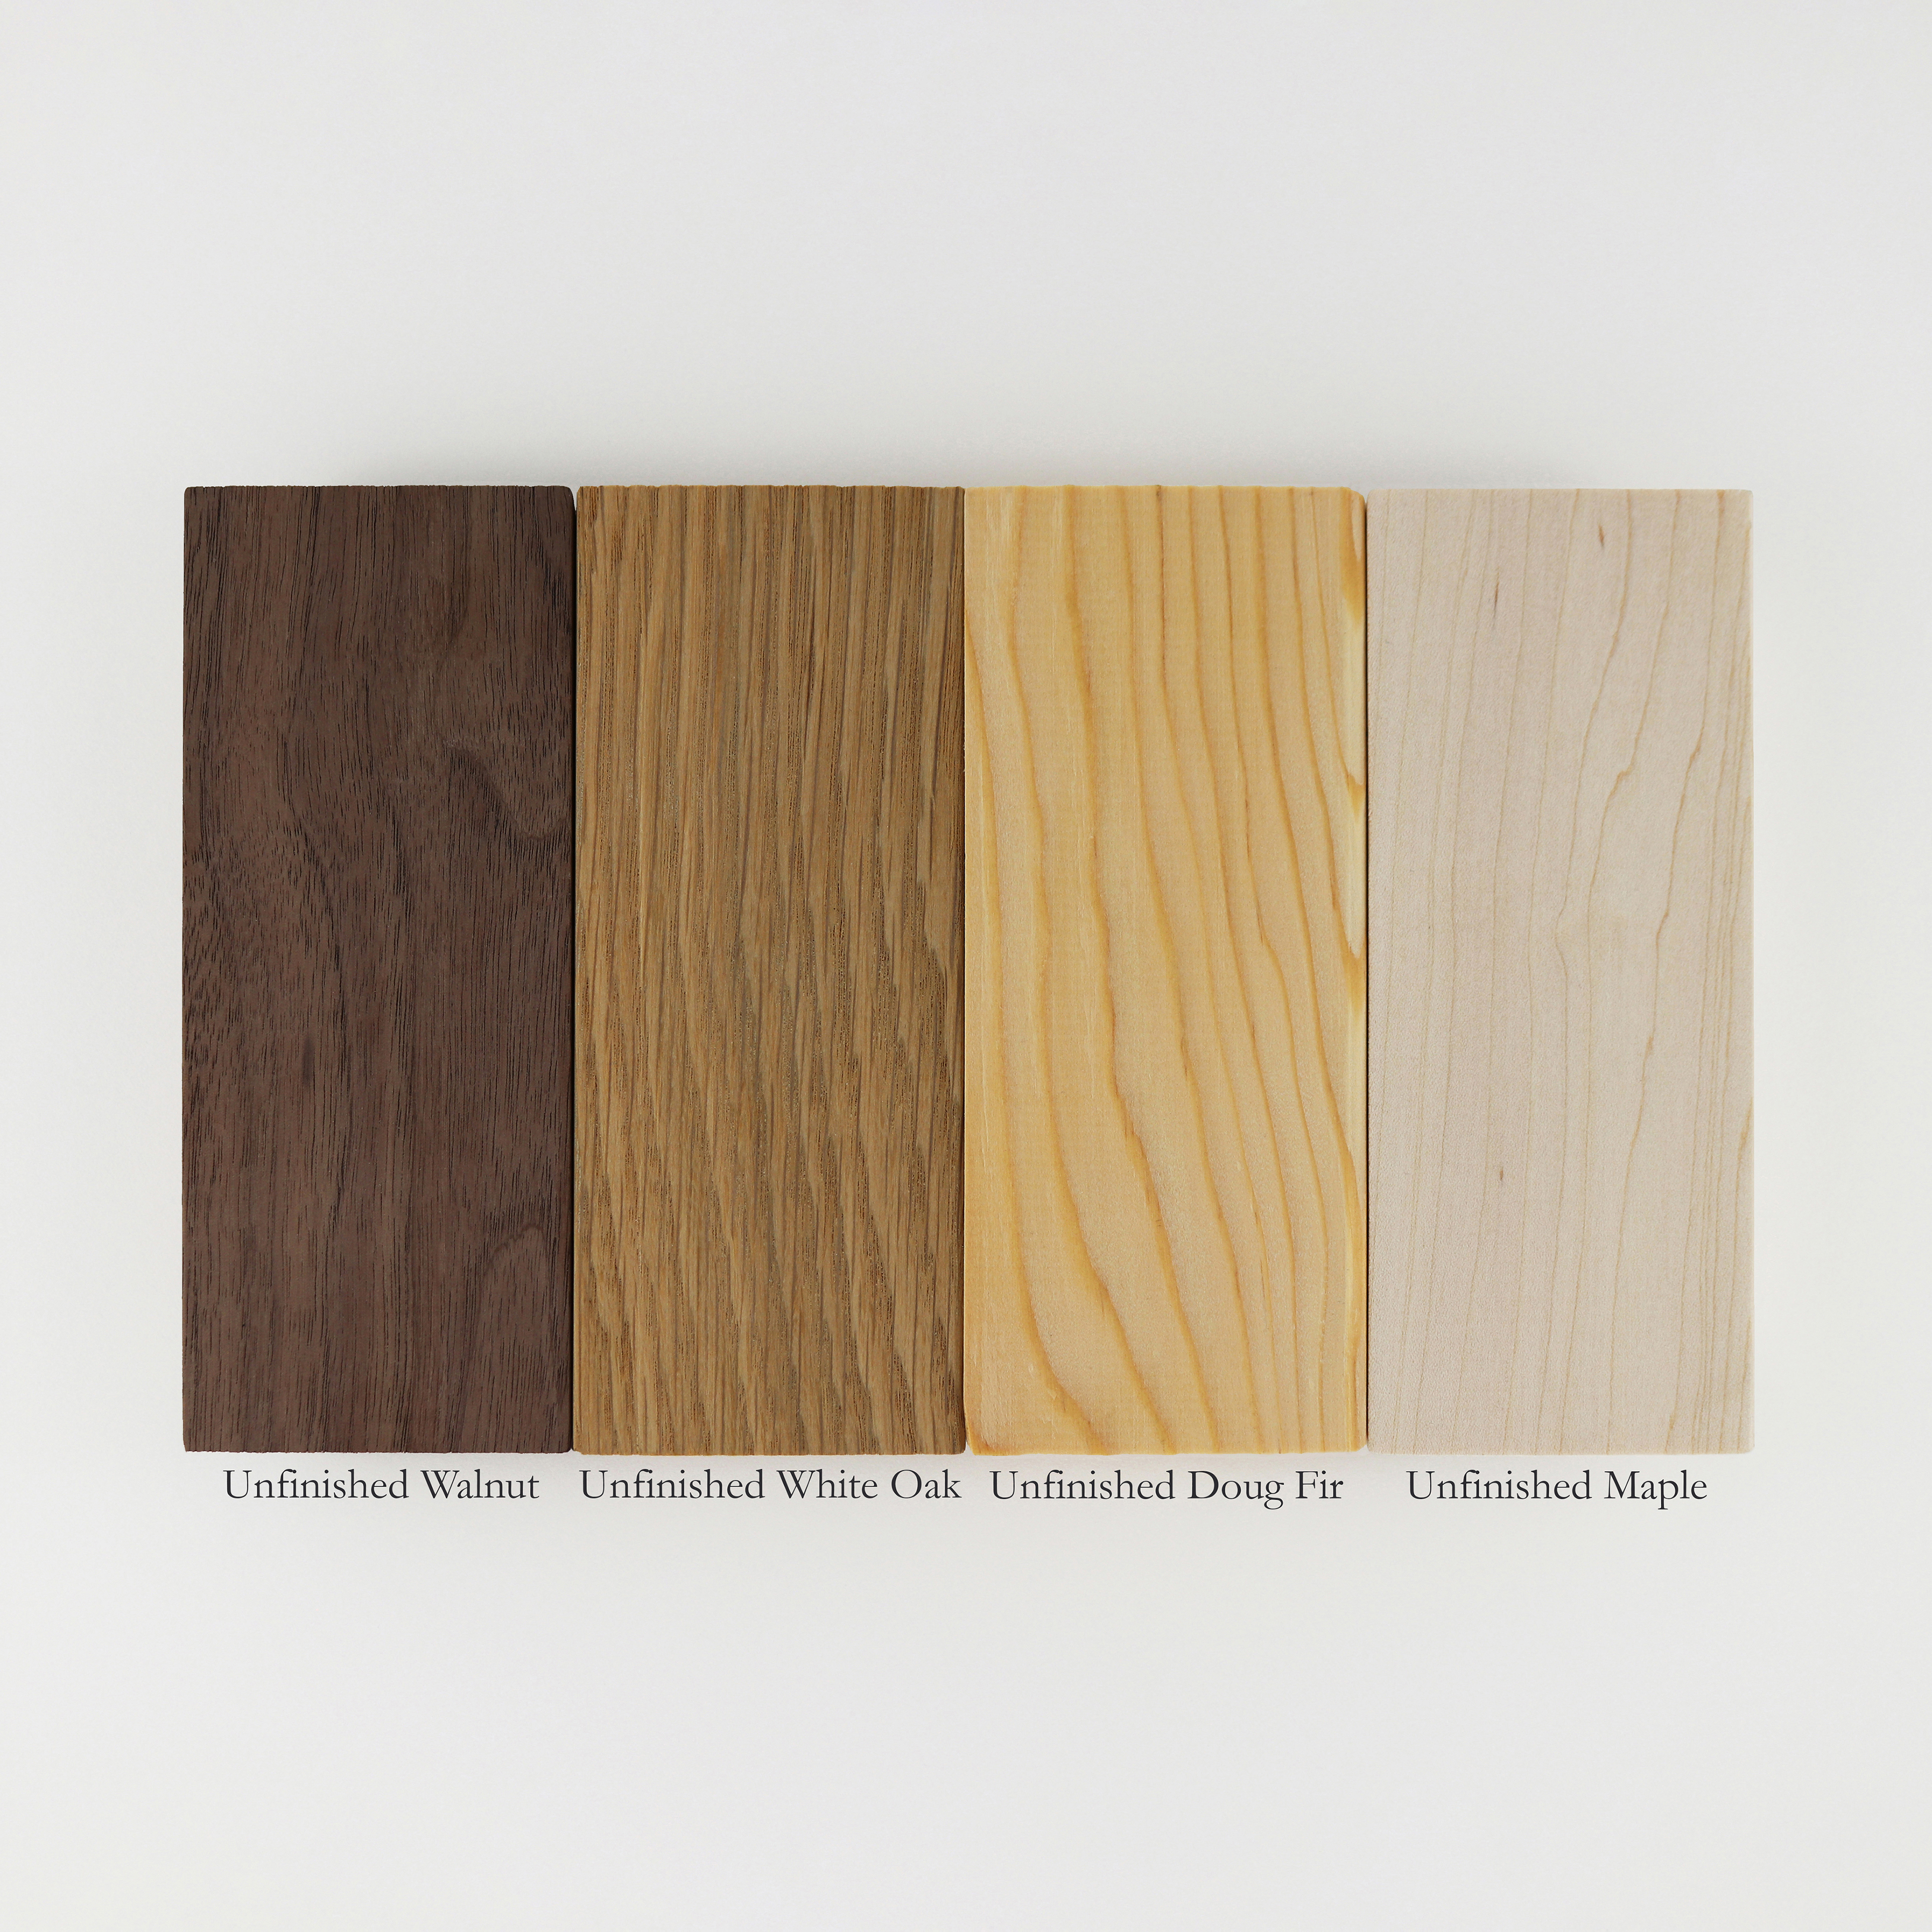
We have four kinds of natural wood frames. They are not stained or finished in any way, just lightly sanded.

The Doug Fir is reddish in color, typically grainy, and the warmest, most rustic wood we carry. It's also the most variable in appearance from stick to stick.

The Maple is the lightest and most muted of our woods. It's less grainy than the Doug Fir and also more consistent in appearance from stick to stick. The Maple is a harder wood.

The White Oak is darker than the Maple; the Walnut is darker still. Neither is grainy. Both are quite consistent in appearance from stick to stick.

The Walnut and White Oak look especially good when oiled 
natural woods compared
Do I need to "finish" your unfinished frames?
You don’t really have to do anything to them. You are of course welcome to treat them as you like. They're lightly sanded, with no coating of any kind. If you want simply to protect the wood and to enhance the color and grain, we have many customers reporting success with products like Danish Oil, Watco Oil, Surfix festool oil, Feed-N-Wax Wood Preserver, Minwax wood conditioner and sealer, Daddy Van’s Furniture Polish, and Varathane natural stain. Our only recommendation is to try out the technique first on an inconspicuous part of the frame (inside back). We can include some scraps of the moulding for you to experiment with. Just put a note in the comments field at checkout asking for some.
 
Can I get samples of your frames?
Yes. We can include up to 3 samples with your next order, free of charge. Just put a note in the comments field at the end of check-out saying, “Please send me corner samples of [A], [B], and [C]. I understand that I can get 3 samples free of charge."
Alternatively, you can place an order just for samples. We'd charge $5 per corner sample, plus shipping. Please email us what you’d like samples of and your shipping address for a quote.
 
Can I mix colors/finishes?
You can mix colors for any size, with the possible exception of 36x36”, 30x48”, and 24x60", provided the order is for a pack of the most expensive color in the pack. So, for example, you could buy a 6 pack of 11x14” gold frames and ask us to send 3 gold and 3 Doug Fir. The items being substituted must not be more expensive than the ones they are replacing. You would do that by putting a note in the comments field at the end of check-out about the exact mix of colors/finishes in your pack. In the case of color substitutions for 36x36”, 30x48”, and 24x60", we may be able to accommodate you. It depends on the particulars. Please email us to confirm.
 
Can I mix sizes?
You may be able to. It depends on the size of the order and on whether or not the particular combination of sizes can be packaged easily for safe transit. Please email us first to make sure the combination you have in mind is doable.
 
Can I buy a single frame?
We sell singles only when they are part of a larger order comprising several frames. If that’s your situation, then please email us the entire list of frames you’d like to order, along with your shipping address, for a complete quote. If you purchase a 3 or 6-pack (as the case might be for the particular size), you can request us to mix and match colors provided the order is for a pack of the most expensive color in the pack. So, for example, you could order a 3-pack of 24x24” 2.5” deep Walnut frames and ask us to send you 2 Walnut and 1 Maple frame. The items being substituted must not be more expensive than the ones they are replacing. You would do that by putting a note in the comments field at the end of checkout about the exact mix of colors/finishes in your pack.
 
How do I center my art in the frame?
If the canvas is not snug in the frame and you need help centering the canvas in the frame, you can use thin strips of cardboard, say about 1-2” wide, as spacers. Put the strips on all 4 sides, between the canvas and the frame, to even out the spacing. Depending on the thickness of your cardboard, you may need to glue together a couple or three layers to get the spacing right. Once the canvas is snug, turn it over and place the brackets in the back and mark each hole with a pen. You can then make small pilot holes with a thin nail before driving the screws. Finally, make sure your canvas is square. You can confirm by comparing the diagonals.
 
How do I repair open corners?
Repair is pretty easy, if you have the right tools. You need a corner clamp and some wood glue. You can get those at home depot and on Amazon. A clamp costs about $10-$15. It’s good to have one around the studio in case of accidents. Here is a set of 4 on Amazon for about $18, (https://a.co/d/1tj5xnN). Just work the glue in to the open joint with your finger-tip, clamp, wipe clean excess glue and wait overnight. For larger sizes, you can further re-enforce the corners from the back with flat L-brackets. Alternatively, you can drive thin nails with small heads from the outside edges of the frame and then cover the pin holes with some wood filler.
 
What do I do if the frame is too tight?
If the canvases are a little bigger than the nominal size, you may still be able to salvage things. There are a couple of potential solutions. One involves making the frames a little bigger. The other, making the canvases a little smaller. If the fit is close, you may be able to sand down the frame a bit right at the problem spot to make more room. Alternatively, if the paintings have bulges in the corners where the canvas is folded and tucked, you can try to hammer the bulges down to make them flatter. If that doesn’t work, you can cut open the folds and cut out some of the excess canvas. You can then glue the seam back up.
 
What do I do if my canvas is sticking out of the frame a little?
Check to see if there are bulges in the back of the canvas where the fabric is folded and tucked in the corners. You can cut open the folds and cut out some of the excess canvas. You can then glue or staple the seam back up.
Do your floater frames come with hanging hardware?
No. We include only the hardware needed to attach your artwork to the frame.  The hardware we send may not work well in all cases.  If you need help finding better choices, please email us for help. 

Can I get standard size frames unassembled?
We normally don’t sell our standard sizes unassembled. There are two exceptions: One, the order also contains large custom sizes like 36x48” and 48x60”. Two, the order is for multiple packs of our largest standard sizes, such as 30x40" and 36x36". Please email us the details to see if your order qualifies. We're eager to help you save on shipping so will make every possible accommodation.
 
Can I use these frames with thin panels, say 1/4" or 1/8" deep?

These frames are not a good bet for thin panels.  Instead, you should probably opt for our 3/4" rabbet floater frames.  But you may also want to consider our “Panel Frames” . Those are meant specifically for thin panels. The website has diagrams of the moulding’s exact profile and how the artwork goes in the frame.

To attach your panels to these frames you will need either glue or double-sided tape or velcro circles or tape. We do not include any hardware. If you want to use glue, the choice of glue will depend on the material of your panels. Wood glue should be a good choice for most anything, including paper. E6000 Adhesive is another good choice. For foam core and other such lighter materials, we use ATG tape. You may be able to use other kinds of double-sided tape as well. Home Depot and Michael’s both sell some strong and thin, two-sided tapes that will work nicely. Finally, some customers report good results with velcro circles and tape you can buy at craft stores. Some customers are using a product called “Elmers Poster Tack” to attach their panels into the frames. It’s easy to use and totally re-usable.

You may also like our "Strip Frames" with the 5/16” rabbet; they’re here

Now for the floater frames… We have a lot of customers who are putting relatively thin panels in our 1.5” deep floater frames. There are several options; they all boil down to somehow propping the panels up by putting some sort of shim/riser in the back. You simply need to prop up your artwork from the back with some cardboard, or foam-core, or wood. Small triangles in the corners will be enough. Once you have the desired height, then, depending on the method you used and your preference, you can then attach the artwork to the panels with glue, double-sided foam tape, or even one-sided tape that's wide enough to stick both to the back of your artwork and to the inside of the frame. You'll need to get a little creative.

Here is one customer’s inventive solution: http://robinrosenthalart.blogspot.com/p/blog-page_16.html


Can I use these frames with 1/2" or 5/8" deep artwork?
These frames are not a good bet for thin panels.  Instead, you should probably opt for our 3/4" rabbet floater frames. Keep in mind that your 1/2" or 5/8” artwork would sit a little low in those frames because they’re designed for 3/4” deep artwork to be flush with the top of the frame. You may be ok with that recessed look. If you’re not, and would rather the canvases be flush with the front of the frame, you’d simply put some sort of shim/riser between your canvas and the frame before attaching the canvas. We would suggest using cardboard or foam-core. Small cardboard triangles, one in each corner, works nicely. You can also use thin strips of double-sided foam tape.
 
What's the difference between the two kinds of Black floater frames?
We have two kinds of black floater frames. The 1.5” and 2.5” deep ones have one kind of finish/paint, and the 1.25” and the 2” deep ones, another. The 1.5” and 2.5” deep ones are slightly more glossy; the wood grain is visible under the paint. The 1.25” and the 2” deep ones have a matte/eggshell finish; you can’t see the wood grain under the paint. Please see the photo below showing a side-by-side comparison of the finish.  The profiles of the two are also slightly different. For exact dimensions, please look at the diagrams on their respective product pages.  

natural woods compared
What's the difference between Doug Fir, Maple, Walnut, and White Oak?

We have four kinds of natural wood frames. They are not stained or finished in any way, just lightly sanded.

The Doug Fir is reddish in color, typically grainy, and the warmest, most rustic wood we carry. It's also the most variable in appearance from stick to stick.

The Maple is the lightest and most muted of our woods. It's less grainy than the Doug Fir and also more consistent in appearance from stick to stick. The Maple is a harder wood.

The White Oak is darker than the Maple; the Walnut is darker still. Neither is grainy. Both are quite consistent in appearance from stick to stick.

The Walnut and White Oak look especially good when oiled 

natural woods compared
Do I need to "finish" your unfinished frames?
You don’t really have to do anything to them. You are of course welcome to treat them as you like. They're lightly sanded, with no coating of any kind. If you want simply to protect the wood and to enhance the color and grain, we have many customers reporting success with products like Danish Oil, Watco Oil, Surfix festool oil, Feed-N-Wax Wood Preserver, Minwax wood conditioner and sealer, Daddy Van’s Furniture Polish, and Varathane natural stain. Our only recommendation is to try out the technique first on an inconspicuous part of the frame (inside back). We can include some scraps of the moulding for you to experiment with. Just put a note in the comments field at checkout asking for some.
 
Can I get samples of your frames?
Yes. We can include up to 3 samples with your next order, free of charge. Just put a note in the comments field at the end of check-out saying, “Please send me corner samples of [A], [B], and [C]. I understand that I can get 3 samples free of charge."
Alternatively, you can place an order just for samples. We'd charge $5 per corner sample, plus shipping. Please email us what you’d like samples of and your shipping address for a quote.
 
Can I mix colors/finishes?
You can mix colors for any size, with the possible exception of 36x36”, 30x48”, and 24x60", provided the order is for a pack of the most expensive color in the pack. So, for example, you could buy a 6 pack of 11x14” gold frames and ask us to send 3 gold and 3 Doug Fir. The items being substituted must not be more expensive than the ones they are replacing. You would do that by putting a note in the comments field at the end of check-out about the exact mix of colors/finishes in your pack. In the case of color substitutions for 36x36”, 30x48”, and 24x60", we may be able to accommodate you. It depends on the particulars. Please email us to confirm.
 
Can I mix sizes?
You may be able to. It depends on the size of the order and on whether or not the particular combination of sizes can be packaged easily for safe transit. Please email us first to make sure the combination you have in mind is doable.
 
Can I buy a single frame?
We sell singles only when they are part of a larger order comprising several frames. If that’s your situation, then please email us the entire list of frames you’d like to order, along with your shipping address, for a complete quote. If you purchase a 3 or 6-pack (as the case might be for the particular size), you can request us to mix and match colors provided the order is for a pack of the most expensive color in the pack. So, for example, you could order a 3-pack of 24x24” 2.5” deep Walnut frames and ask us to send you 2 Walnut and 1 Maple frame. The items being substituted must not be more expensive than the ones they are replacing. You would do that by putting a note in the comments field at the end of checkout about the exact mix of colors/finishes in your pack.
 
How do I center my art in the frame?
If the canvas is not snug in the frame and you need help centering the canvas in the frame, you can use thin strips of cardboard, say about 1-2” wide, as spacers. Put the strips on all 4 sides, between the canvas and the frame, to even out the spacing. Depending on the thickness of your cardboard, you may need to glue together a couple or three layers to get the spacing right. Once the canvas is snug, turn it over and place the brackets in the back and mark each hole with a pen. You can then make small pilot holes with a thin nail before driving the screws. Finally, make sure your canvas is square. You can confirm by comparing the diagonals.
 
How do I repair open corners?
Repair is pretty easy, if you have the right tools. You need a corner clamp and some wood glue. You can get those at home depot and on Amazon. A clamp costs about $10-$15. It’s good to have one around the studio in case of accidents. Here is a set of 4 on Amazon for about $18, (https://a.co/d/1tj5xnN). Just work the glue in to the open joint with your finger-tip, clamp, wipe clean excess glue and wait overnight. For larger sizes, you can further re-enforce the corners from the back with flat L-brackets. Alternatively, you can drive thin nails with small heads from the outside edges of the frame and then cover the pin holes with some wood filler.
 
What do I do if the frame is too tight?
If the canvases are a little bigger than the nominal size, you may still be able to salvage things. There are a couple of potential solutions. One involves making the frames a little bigger. The other, making the canvases a little smaller. If the fit is close, you may be able to sand down the frame a bit right at the problem spot to make more room. Alternatively, if the paintings have bulges in the corners where the canvas is folded and tucked, you can try to hammer the bulges down to make them flatter. If that doesn’t work, you can cut open the folds and cut out some of the excess canvas. You can then glue the seam back up.
 
What do I do if my canvas is sticking out of the frame a little?
Check to see if there are bulges in the back of the canvas where the fabric is folded and tucked in the corners. You can cut open the folds and cut out some of the excess canvas. You can then glue or staple the seam back up.